Tuesday, February 16, 2010

TA DA!!

By drawing inspiration from Annette Kellerman and also the picture of all the knitted wool (pictured below) I wanted to create a swimsuit that drew from Annette's strong yet still feminine shape.

By keeping the swimsuit simple and feminine I then created strong knitted tubbing for neck and hips to create a more strong and structured suit.

A lot of the swimsuits back in the 1920's - 1930's for women were to cover their bodies. A lot of bathers included full shorts or skirts at the bottoms to cover the female form.

The tubbing around the hips was to create the 20's and 30's skirt or shorts that were typically worn.

I really enjoyed this project. It was the first time I'd used stretch fabrics which was good. I now feel confident enough to use more and although I was not able to take photos of the final piece on a female like I had hoped. I hope you can still see my swimsuit shaping and details and like it.
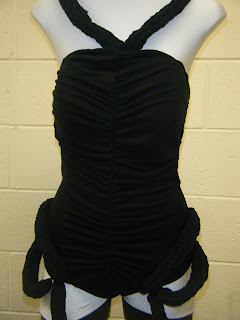
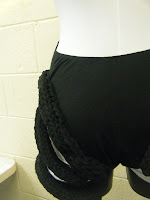


Nearly There!

Ive got my knitting tubbing all sorted! I now know that I want to use 6 loose stitches to create my knitting tubbing around the neck and over the hips.

I had a little trouble with the gathering at the centre front of the swimsuit. I would run a gathering stitch and gather up the front to the length that is needed. I would then overlock the edges to hold however, the overlocking was not able to keep the gathers in place and it would cause the front to stretch back out to its original form.

We tried a few technigues to try and get it right. The main problem was that because the fabric is so stretchy. If we were to keep the gathering stitch in it would just end up snapping the cotton and the gathers would un-do.

To over come this problem I gathered like normal. overlocked each edge and when sewing the 2 centre front pieces together I had to use a zig zag stitch and sew in a piece of Jelly Elastic to hold.

this worked and I was now able to start cutting and sewing my final swimsuit.

This is a photo of the Front piece which has been divided and extended to create gathering down the centre front of the swimsuit.

Meh!

I thought doing some gathering at the back would be interesting to tie in with the gathering at the front of the bathers, but............. it doesnt look so good..

Its quite baggy over the top of the bottom. I don't think it would be very flattering..


Monday, February 15, 2010

French Knitting!


I started the French Knitting today using a empty can which has both ends removed.

I cut thin 1.5cm strips of the wool fabric which we are using for the actual garment.
I decided on 1.5cm strips because when the fabric strips are pulled tightly it curls on itself and creates a thin strand just like wool.

I used a small "tomboy" with just 4 paddle pop sticks but that tube was not quiet thick enough.

I then used 8 paddle pop sticks which created a nice thick tube but it was quite big and I think it would be too heavy to hold up over the hips.

So i decided to use just 6 paddle pop sticks and it made a smaller tube. by leaving the stitches quite loose i was able to create a tube where you could see the stitches alot better.


Design Ideas!

Started doing toile for my design. I wanted to keep the bathing suit quite simple so the knitted tubbing will stand out..

I decided to do a quick patten of my idea to see if I would like it. I used just thin bits of fabric as an example of where the knitted tubbing would go. I liked around the neck line and also over the hips.

I wanted to try and keep the shape of my swimsuit to suit the bathers back in early 1920-1930's swim wear.

Bathers back then for women were to cover the body. A lot of skirts and shorts styles were worn to cover the female form.

Id like to use the knitted tubbing to keep that look and shape.


French Knitting! Of Course!

I came up with an interesting idea that I thought could work well as detailing. I remember when I was little back in primary school making a "Tomboy" tube out of a used toilet roll and some paddle pop sticks and weaving wool around each stick until it slowly created a knitted tube inside the used toilet roll.

I researched on the internet and its actually called a "French Knit". Very simple to do and decided to do a bit of looking around at different wools to use..

I bought normal wool, fluffy wool, glittery wool and feathery wool.

I started some knitting but i was not happy with the effect. Normal wool was too fine and and the tubes were not structured enough. Like in the photo on the right side. The knitting is quite loose and flat.
All of the fluffy wools were ok but you could not see any of the knitting detailing and just looked like something a cat would like to play with.

Here are some examples..


Design, Design, Design!!

We started on our design ideas and spent 2 days just drawing and trying to develop them further.

I really like the inspiration picture I was given of the Knitted wool. I think alot can be done with ideas drawn from that photo.

Now I just need to think of something interesting......hmmm........